Automated Response
1. Automated Process Introduction
With this feature, you can create an automated response process for the support robot to reply to visitor messages, answer initial inquiries, guide customers to place orders, and more. This enhances consultation efficiency and reduces customer complaint rates.
2. Function Description
2.1. Create an Automated Process
In Robot–Automated Process, you can manage and create your automation workflows.
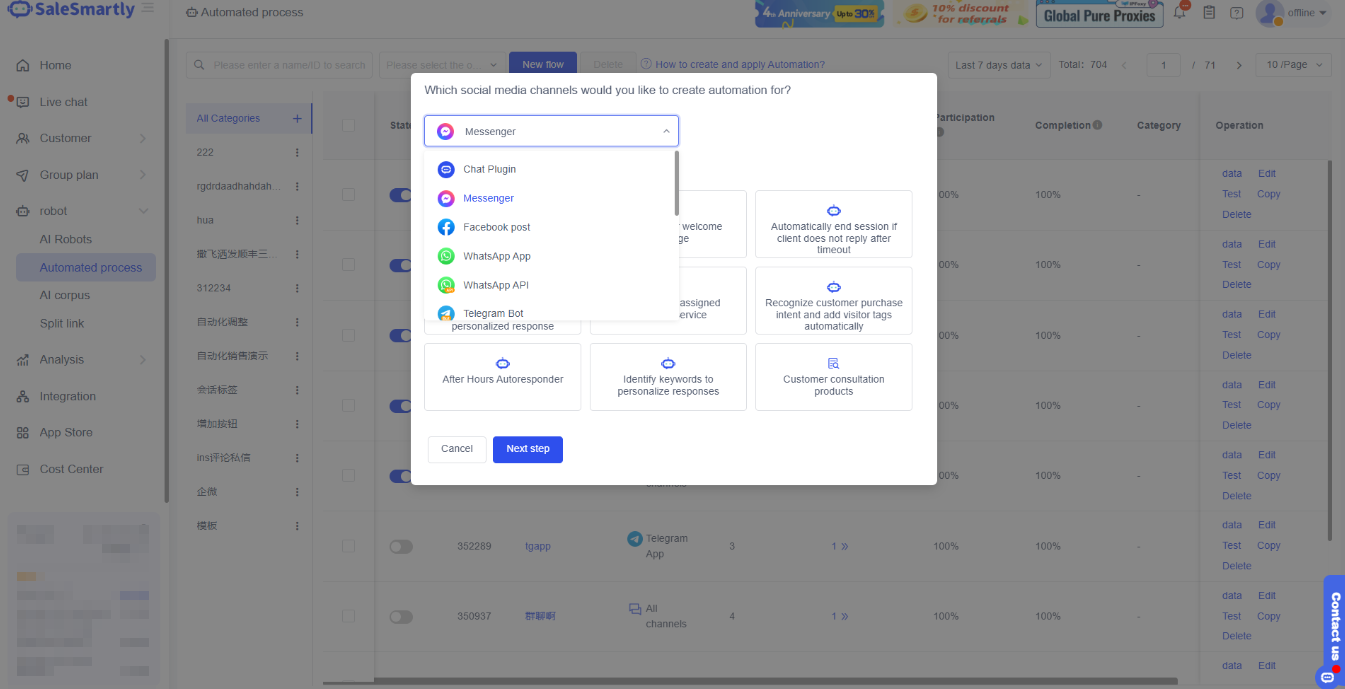
Click Create New Flow (using the Messenger channel as an example) → Select Messenger channel or Facebook Post Comments (choose the channel you want to configure automation for) → Click Next.
2.2. Introduction to Automation Components
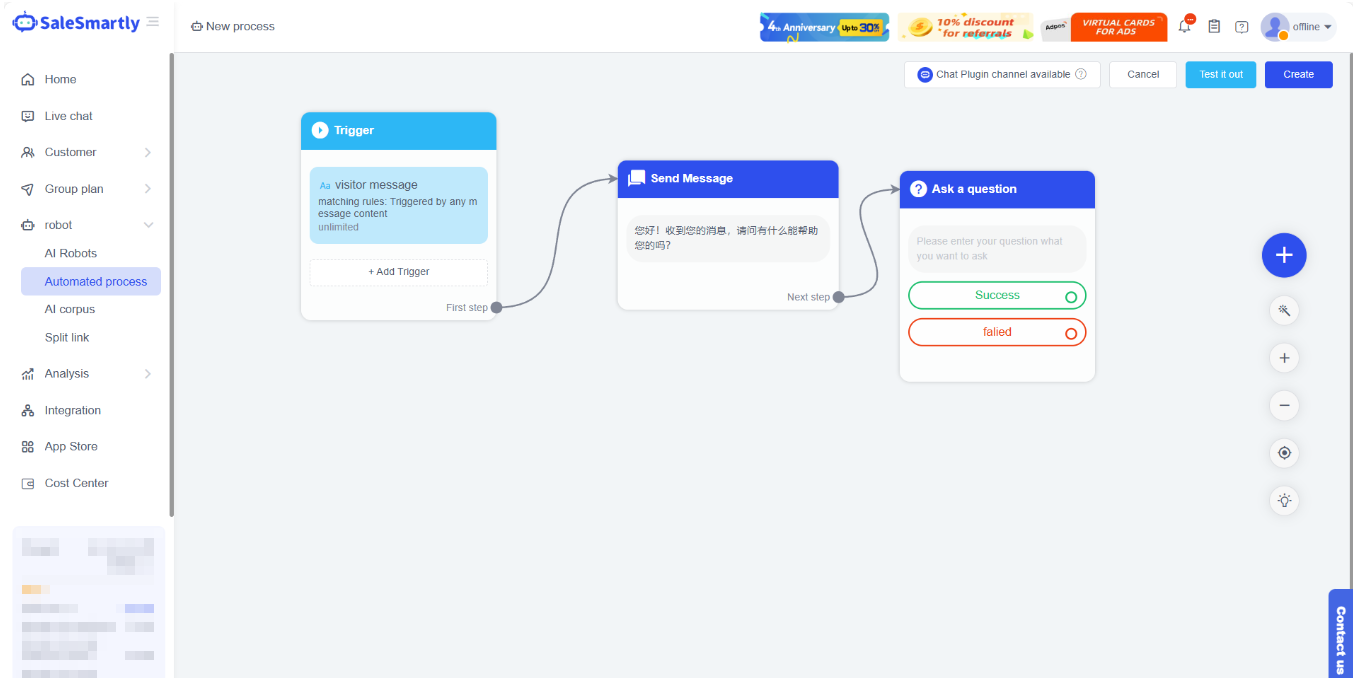
Setting up an automated process mainly involves three components: triggers, conditions, and actions. A flexible combination of these different components can meet various business scenarios.
- Trigger: When activated, the automated process will proceed to the next action. You can set multiple triggers for different situations.
- Action: After being triggered, the action will begin execution. You can perform various operations on customers, such as sending messages, adding visitor tags, etc.
- Condition: Can be inserted between a trigger and an action to branch into different processing flows for different scenarios.

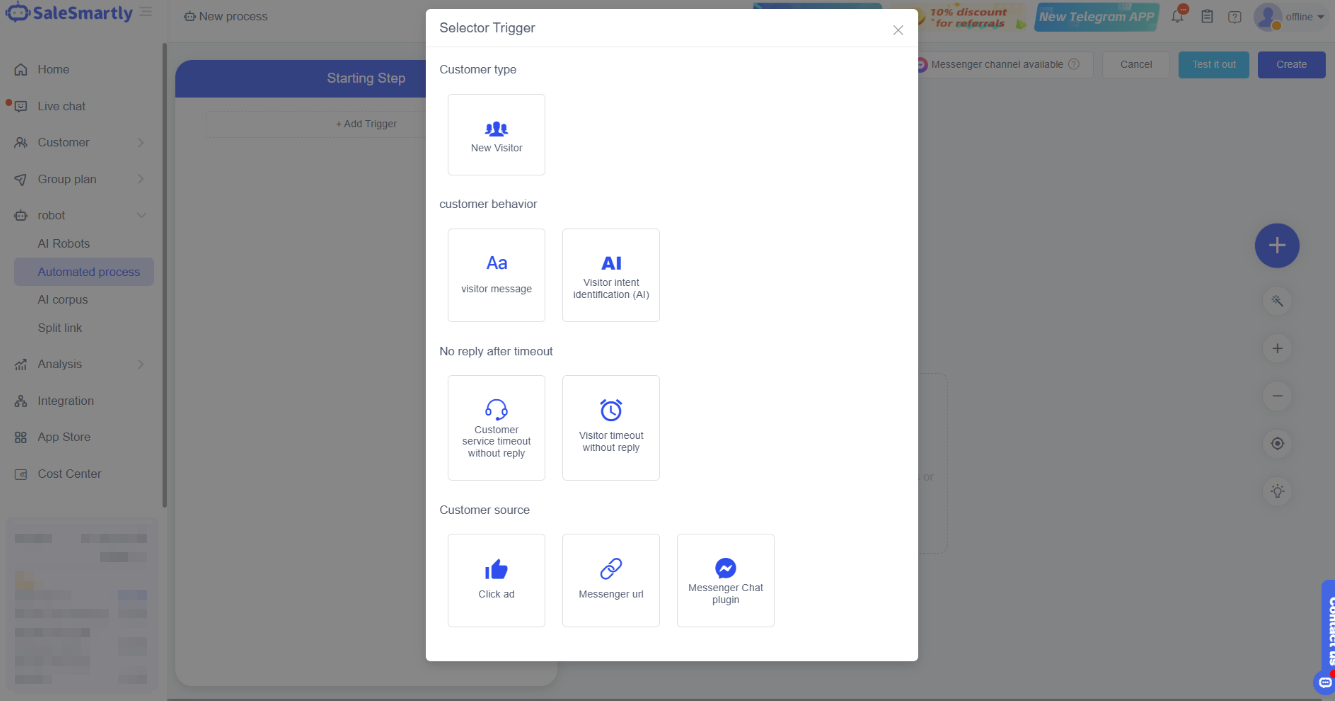
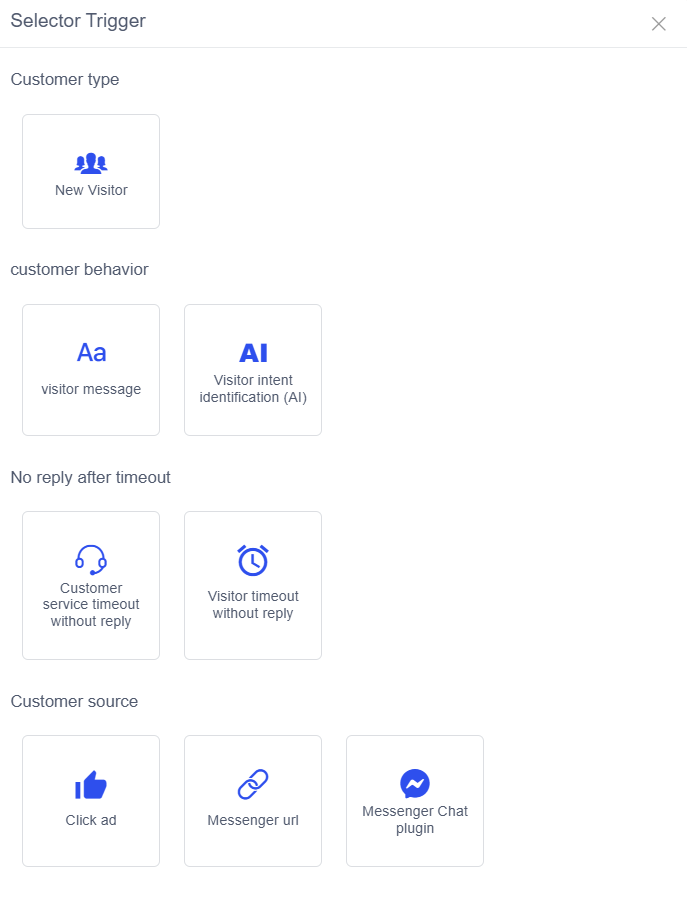
2.3. Select a Trigger
Click the Trigger module to add/delete triggers, edit trigger conditions, etc.
- Add trigger: Click +Add trigger, select the desired trigger from the panel, and click to add it. Some triggers require editing conditions; after editing, the trigger will be added.
- Delete trigger: Hover over the trigger you want to delete → click ╳ to remove it.
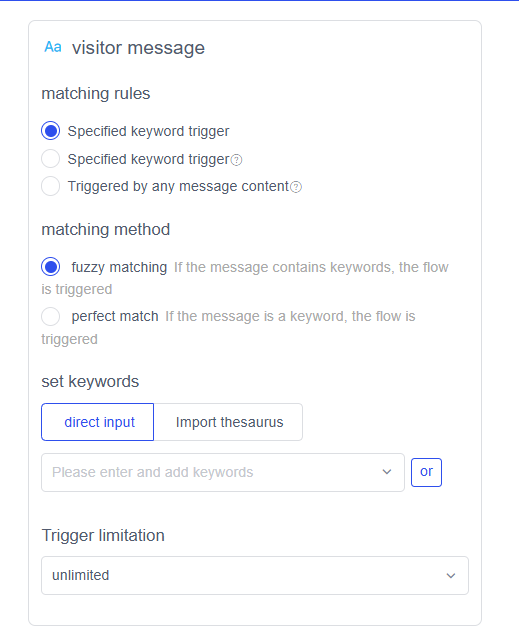
- Edit trigger conditions: Click the Trigger module to edit the conditions of the desired trigger, or edit it when adding a new one. For example, if you select the Keyword trigger, you need to fill in the keyword set and choose the matching status.

2.3.1 Trigger Types
Description: Triggers are divided into four groups: customer type, customer behavior, timeout, and customer source.
- Customer type: Triggers used to identify the type of customer.
- Customer behavior: Triggers related to behavior, such as recognizing the intent of a customer's message.
- Timeout: Triggers when a CS agent or customer does not respond within a set time.
- Customer source: Triggers related to the customer's origin (currently available for Facebook channels).
Note: The icons below the triggers, conditions, and actions indicate the applicable channels. Omnichannel means the module can be used on all channels.
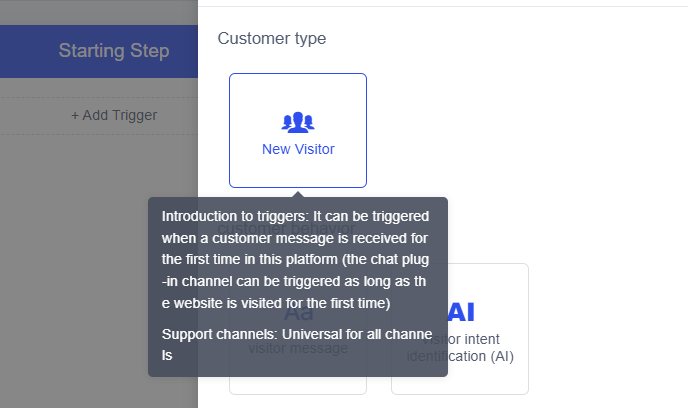
- Customer Type
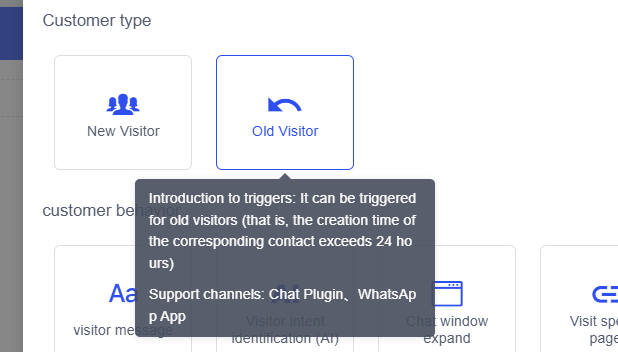
- New Visitor (Omnichannel): Triggers when a customer receives a message on the platform for the first time (for the Chat Plugin channel, it triggers when the customer first visits the website).
- Returning Visitor (Chat Plugin channel): Triggers for a returning customer (a contact that was created more than 24 hours ago).
- Customer Behavior
- Visitor's Message (Omnichannel): Triggers based on the content of the message sent by the customer, through keyword matching and other methods.
* **Visitor Intent Recognition (AI) (Omnichannel):** Customize questions/statements that customers might send based on business scenarios; triggers when the customer's message is sufficiently similar (the AI model automatically recognizes the intent).

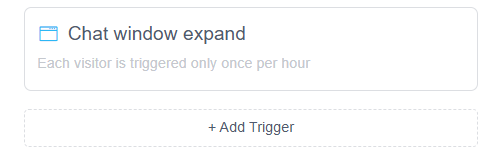
* **Open Chat Window (Chat Plugin channel):** Triggers when a customer clicks the live chat button on the website.
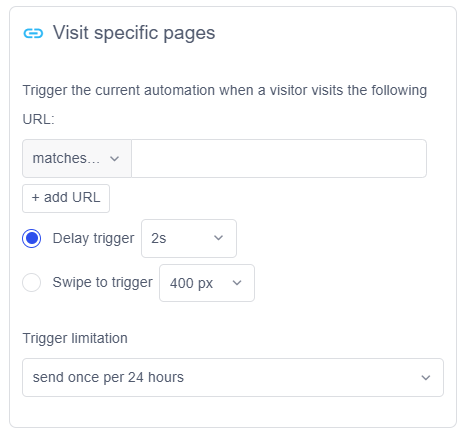
* **Visit Specific Page (Chat Plugin channel):** Triggers when a customer visits a specific URL on a website where the chat plugin is integrated.
* **Save Visitor Information (Chat Plugin channel):** Triggers when a customer opens the chat window and submits information through a pre-chat survey or an advanced information-saving form.
- Timeout
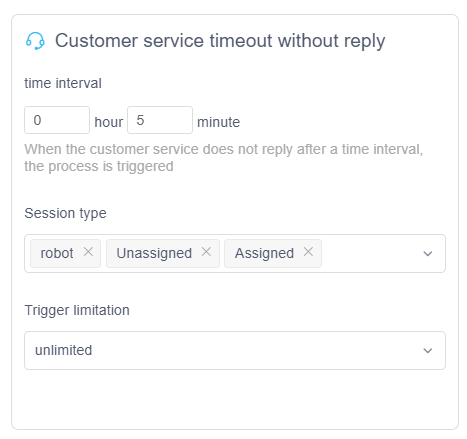
- CS Timeout (Omnichannel): Triggers when, after you send a message, the CS agent does not respond within the set time frame.
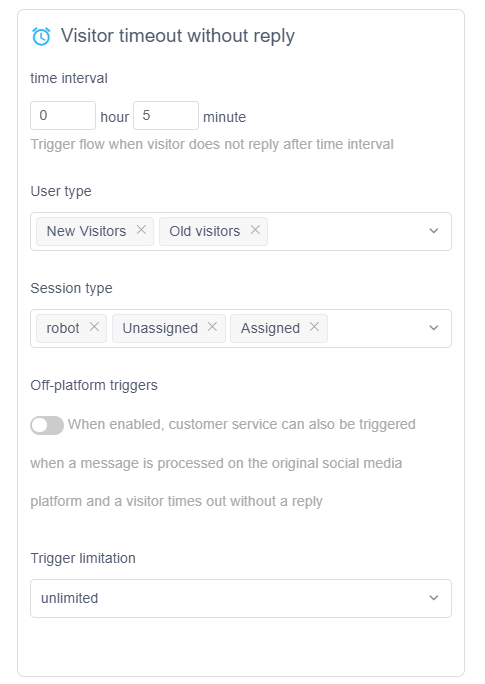
* **Visitor Timeout (Omnichannel):** Triggers when a CS agent sends a message but the customer does not respond within the set time frame.
- Customer Source
- Click Ad (Messenger): Triggers when a Facebook user clicks an ad, resulting in a chat.
- Messenger URL: Triggers when a Facebook user opens a chat via the Messenger address of a public page.
- Messenger Chat Plugin (Messenger): Triggers when a Facebook user initiates a chat via the official Messenger plugin embedded on your website.

2.4. Add a Step
Click “+” to add a new step and choose a condition or action.
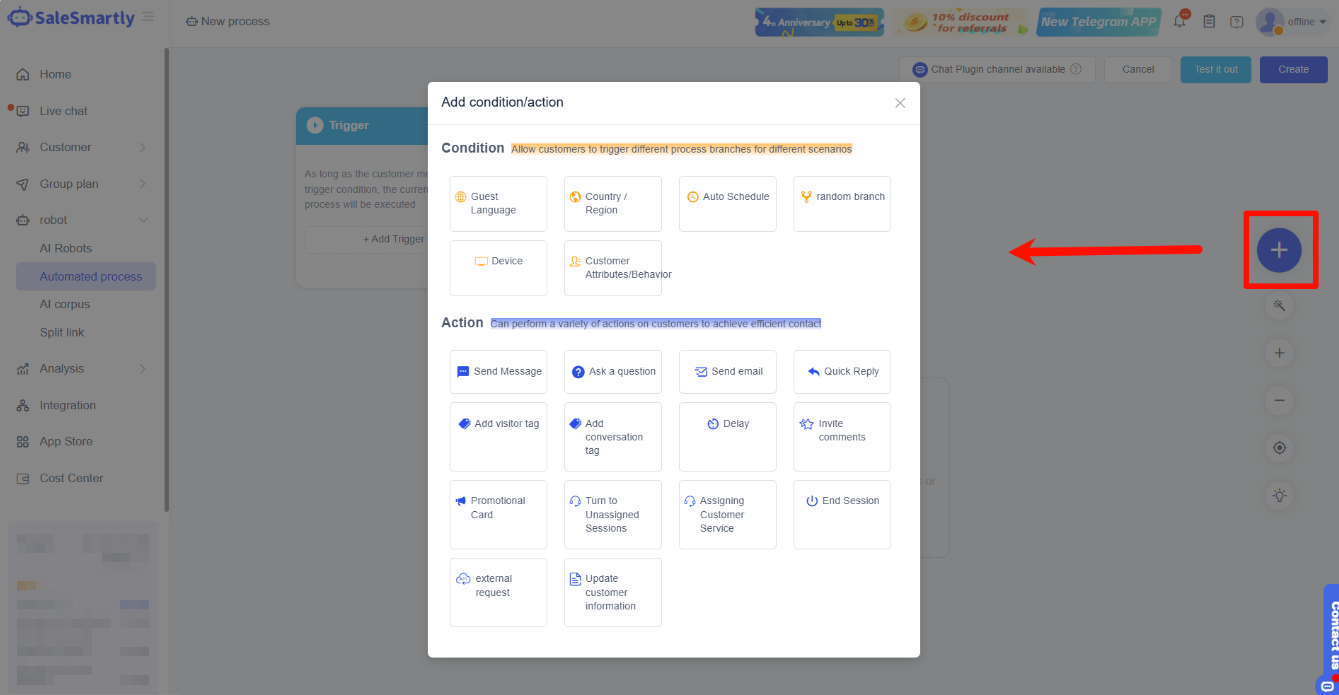
2.4.1 Introduction to Conditions
When the process reaches a condition, the system will automatically evaluate whether the condition is met and then proceed according to the flow you have set up.
- Customer Language: When this condition is met, the system automatically determines if the customer's language matches the condition and then proceeds with the flow.
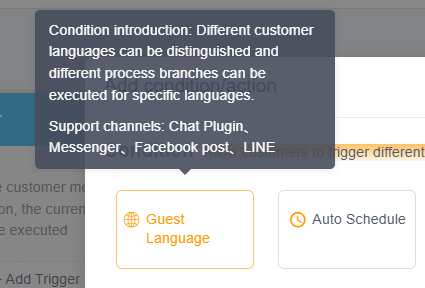
Note: For the Chat Plugin, the system checks the language condition based on the browser language. For other channels, it relies on the language field in the customer's information.
Telegram and Instagram cannot retrieve language information; therefore, if a process with this condition is applied to these two channels, only the condition not met branch will be triggered.
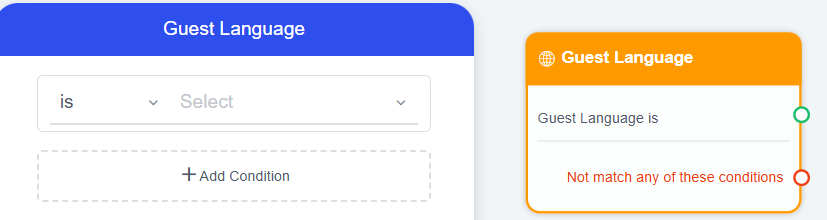
- Auto Schedule: When this condition is met, the system determines if the customer's access time matches the automatic execution time range you set, and then proceeds with the flow. (When setting up, drag the green block to select the time range.)
- Random Branch: Allows different customers to fall into different process branches according to random rules.

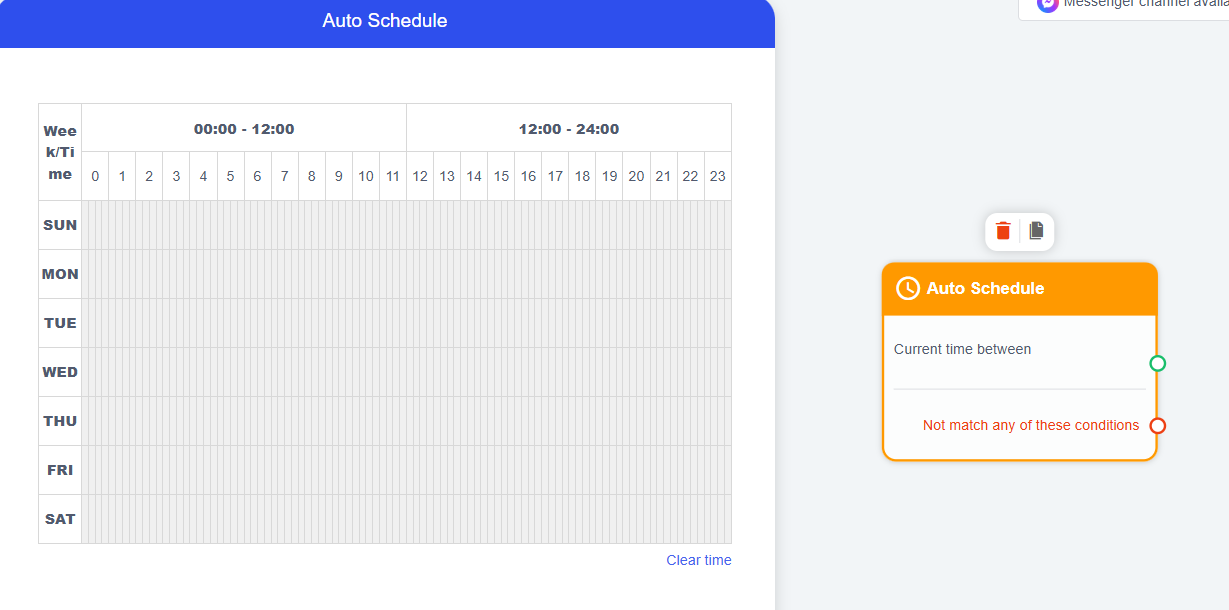
- Customer Attributes/Behavior: An automatic condition filter; the new customer attributes support filtering with a combination of multiple conditions. Contacts that meet the conditions will follow the match branch, while those that do not will follow the no match branch.
2.4.2 Introduction to Actions
An action is an operation the system proactively performs on a customer, such as sending a message or ending a session.
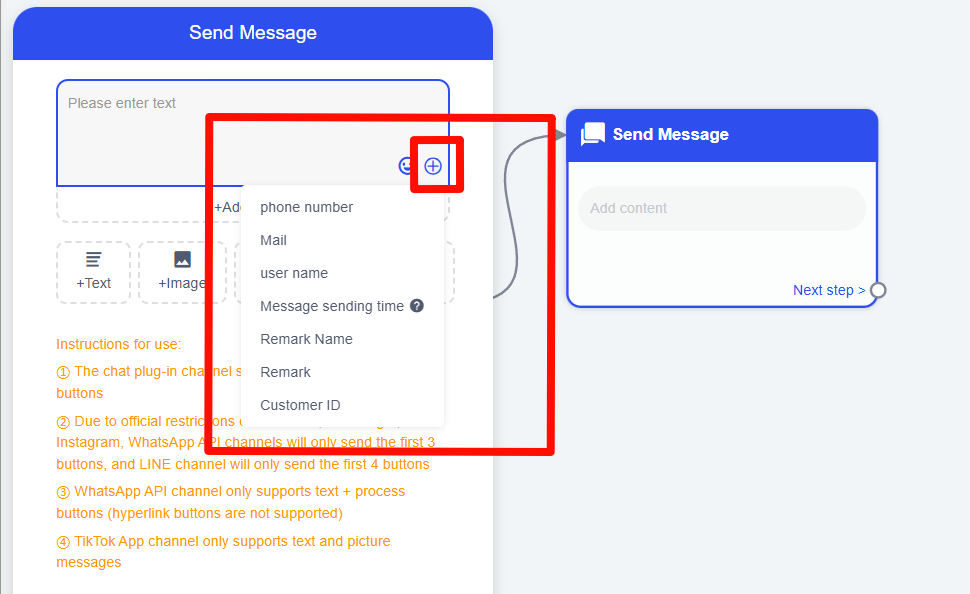
- Send Message: When executed, the system will send a message to the customer. The message type can be text, image, audio, video, or a combination. Text and image messages can have buttons added to lead to the next action.
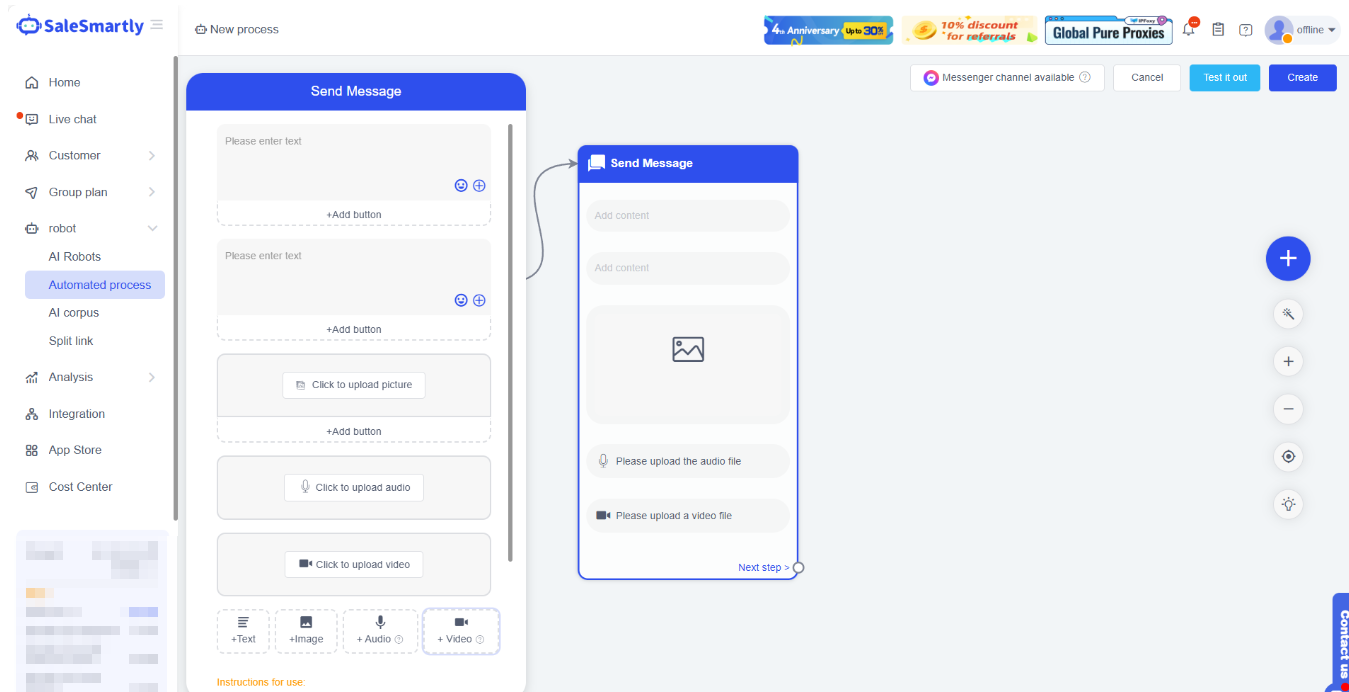
You can also insert "variables" into text messages. Currently, 6 variables are supported: phone number, email, name, message sending time, remark name, and remark.
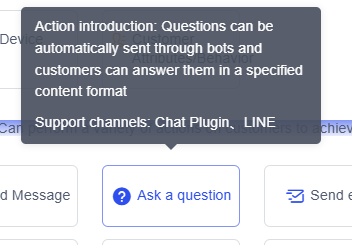
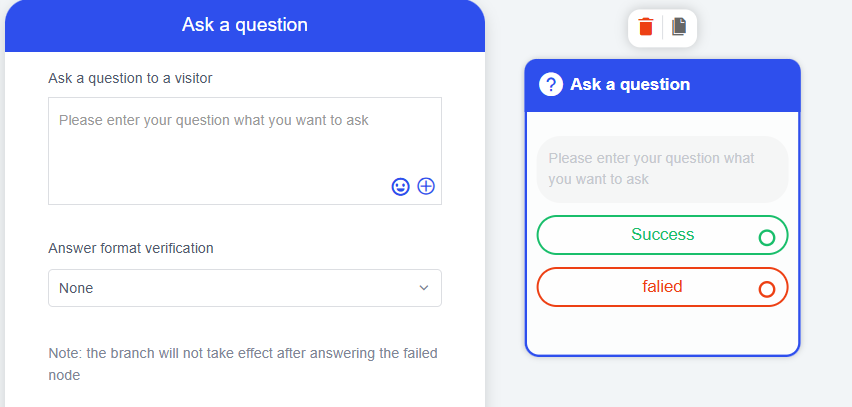
- Ask a Question (Chat Plugin channel): When executed, the system sends the customer a list of questions to collect information.
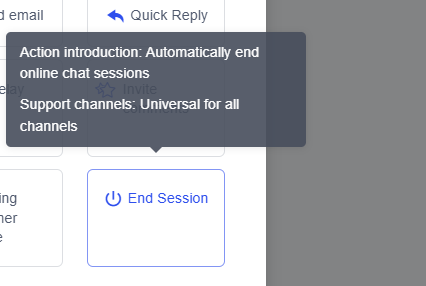
- End Session: When executed, the session will automatically end and will no longer be displayed on the chat page. You will need to review it in Session Management.
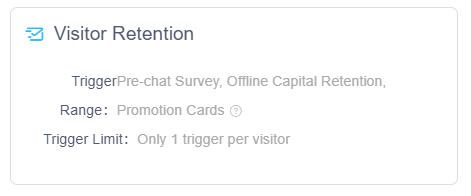
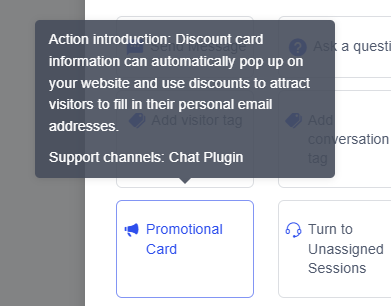
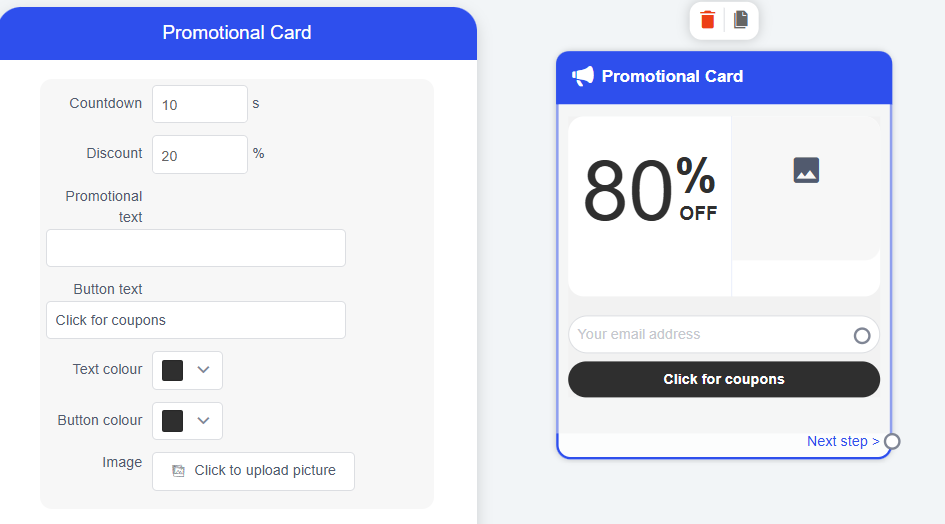
- Promotion Card: When executed, the system sends a promotion card to the customer; customers can receive a coupon by filling in their email. You need to complete information such as the discount amount, promotion message, button text, etc.
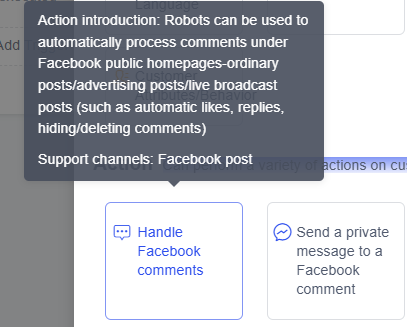
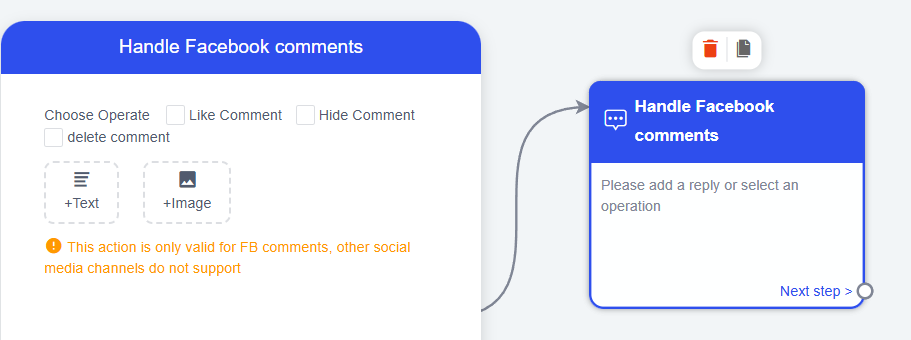
- Handle Facebook Comments (Facebook comments): Automatically reply to, like, and hide comments under Facebook posts. The reply type can be text, image, or a combination.
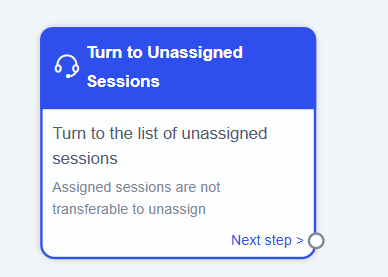
- Assign to Unassigned List: Moves the session to the unassigned list.
Note: An assigned session cannot be moved back to the unassigned list.
- Delay: Delays the execution of the next action. After setting a Delay, you must add a subsequent action for it to take effect.

- Send Private Message to Facebook Commenter (Facebook comments): The robot can automatically send a private message to someone who has commented under a public post/ad/livestream.

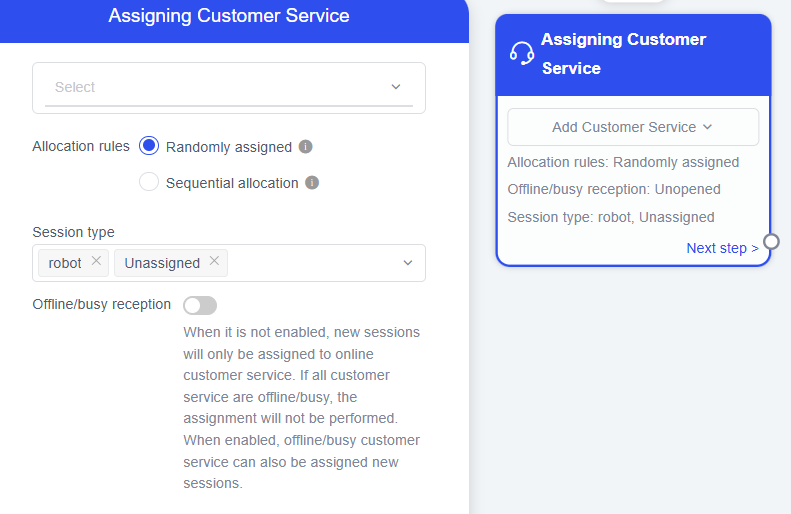
- Assign CS Agent: Live Chat sessions can be automatically assigned to a specified customer service agent for subsequent handling.
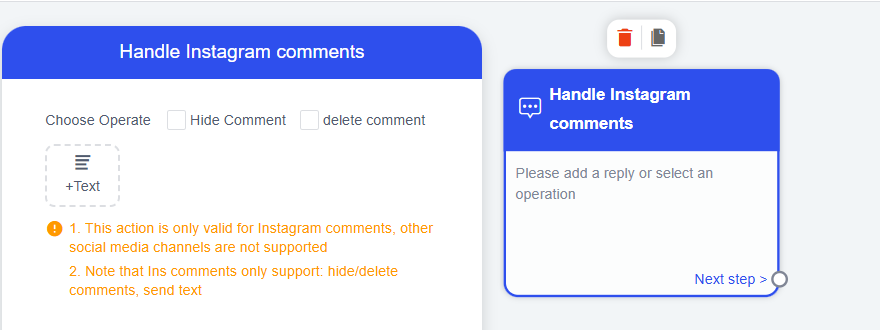
- Handle Instagram Comments (ins post comments): The robot can automatically handle comments under Instagram posts/stories/REELS (e.g., auto-reply, hide/delete comments).
- Invite for Review (Chat Plugin channel): Automatically sends a review invitation card to customers visiting the website.
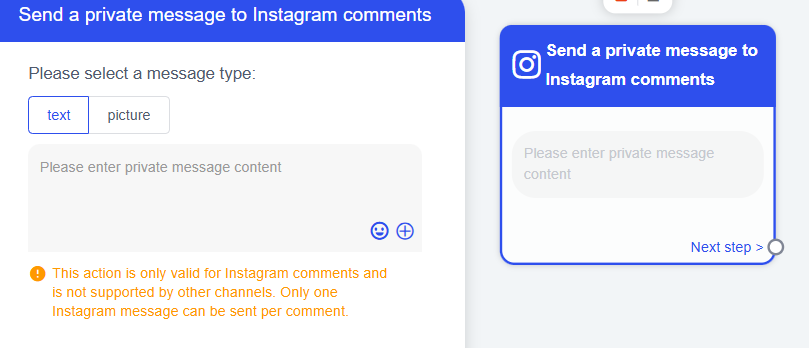
- Send Private Message to Instagram Commenter (Instagram post comments): The robot can automatically send a private message to someone who has commented under a post/story/REEL.
- Quick Button (Chat Plugin channel): The robot automatically sends a message with a button to the customer.
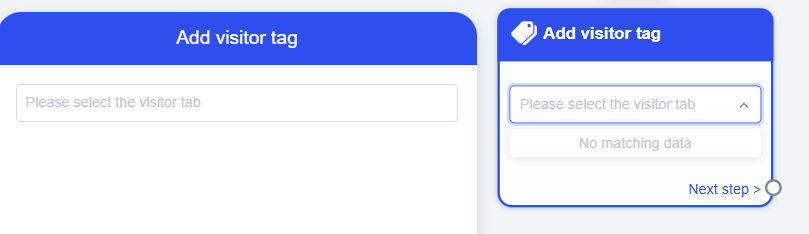
- Add Visitor Tag: Automatically assigns a tag to the customer.
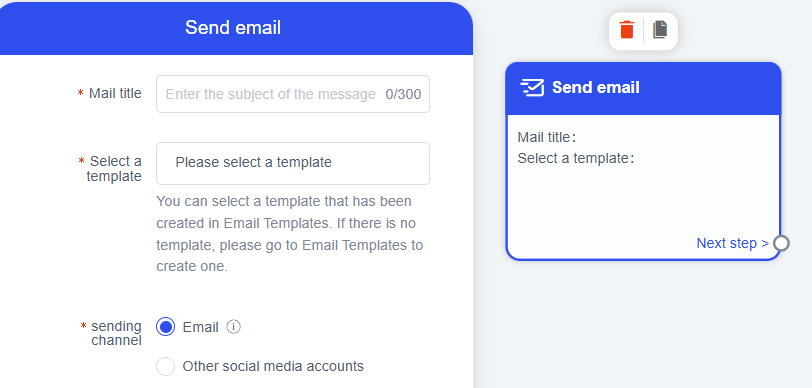
- Send Email: When executed, the system will send an email to the customer.
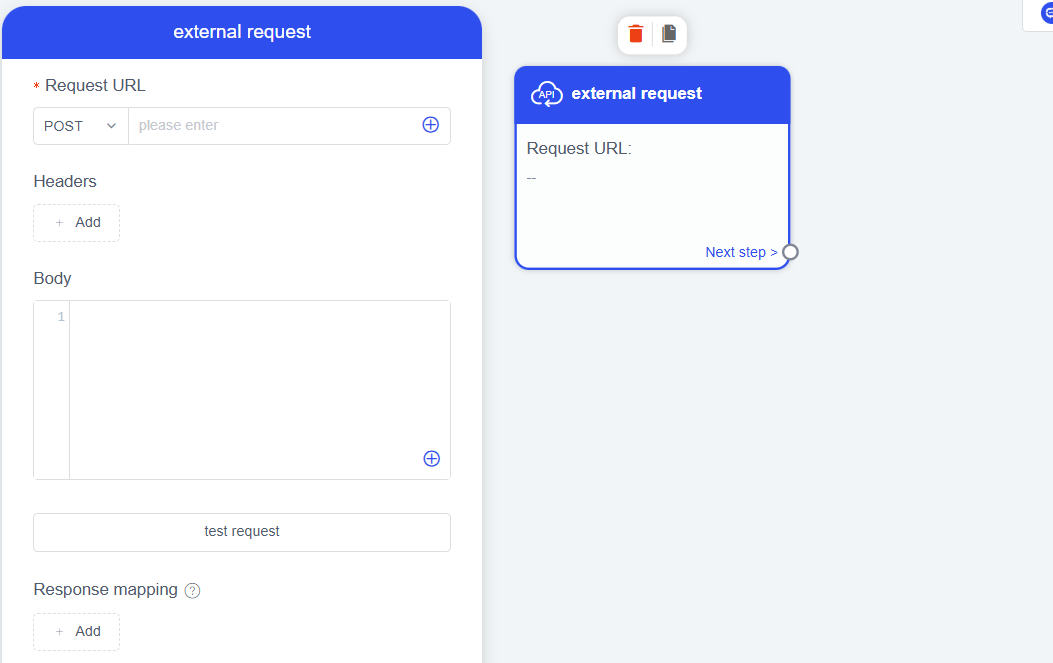
- External Request: Supports sending an HTTP request to your server or a first-party system to integrate contact data between systems.
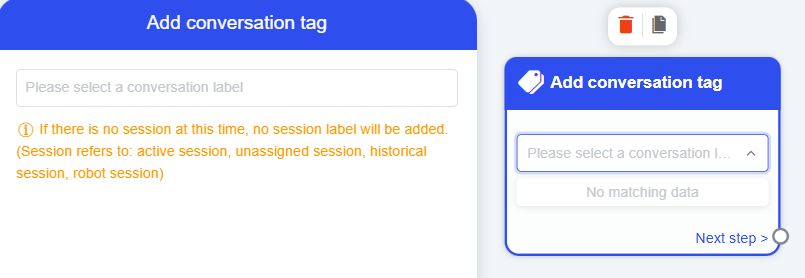
- Add Conversation Tag: Automatically assigns a tag to conversations.
2.5. Connect Triggers, Conditions, and Actions
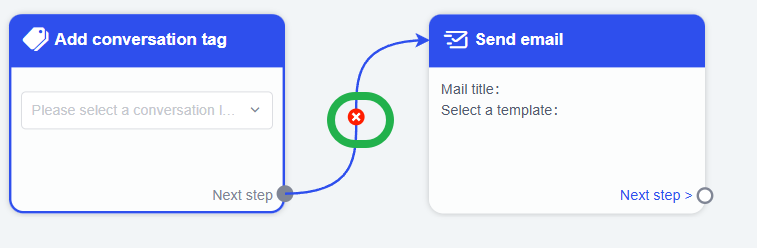
After setting up the triggers/conditions/actions, you need to connect the nodes with links.
If you want to remove a link, hover over the connecting line and click ╳ to cancel.
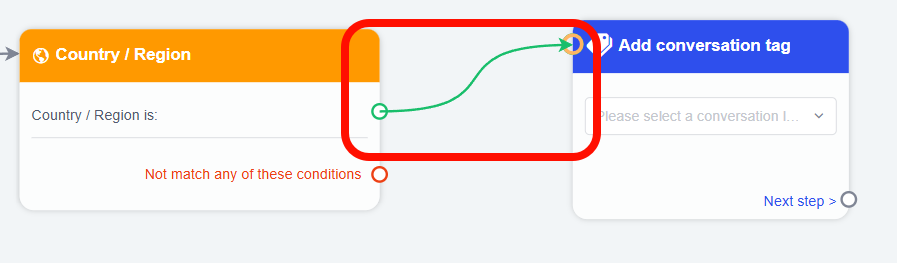
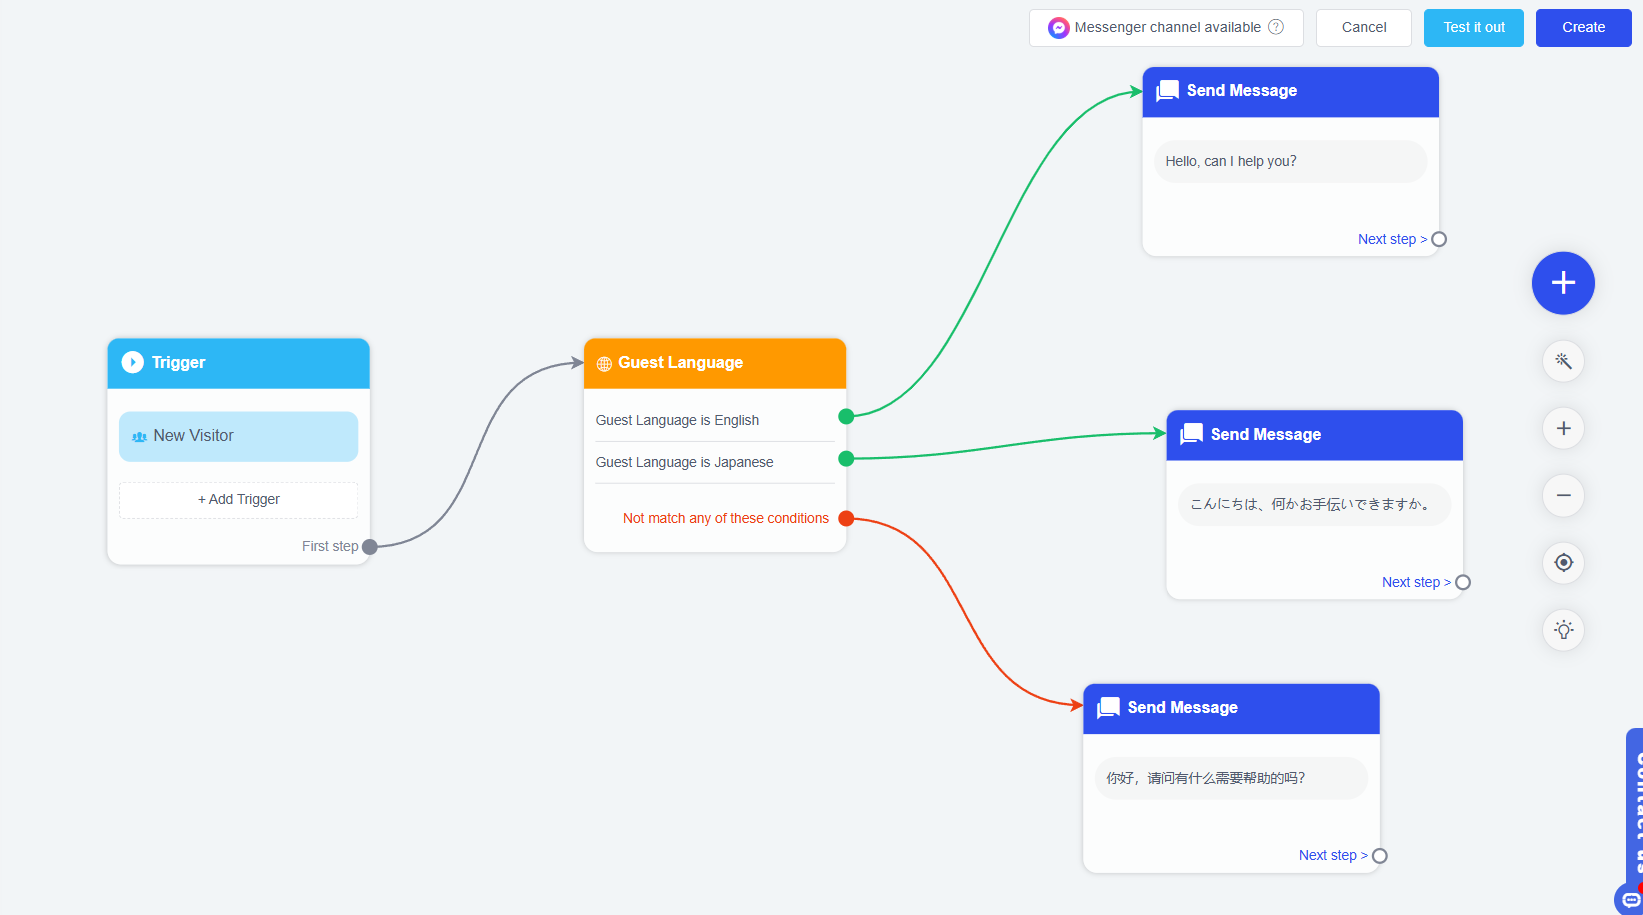
Simple Example:
As shown below, when a new visitor (trigger) arrives, information (action) in different languages will be sent based on their country/region (condition).
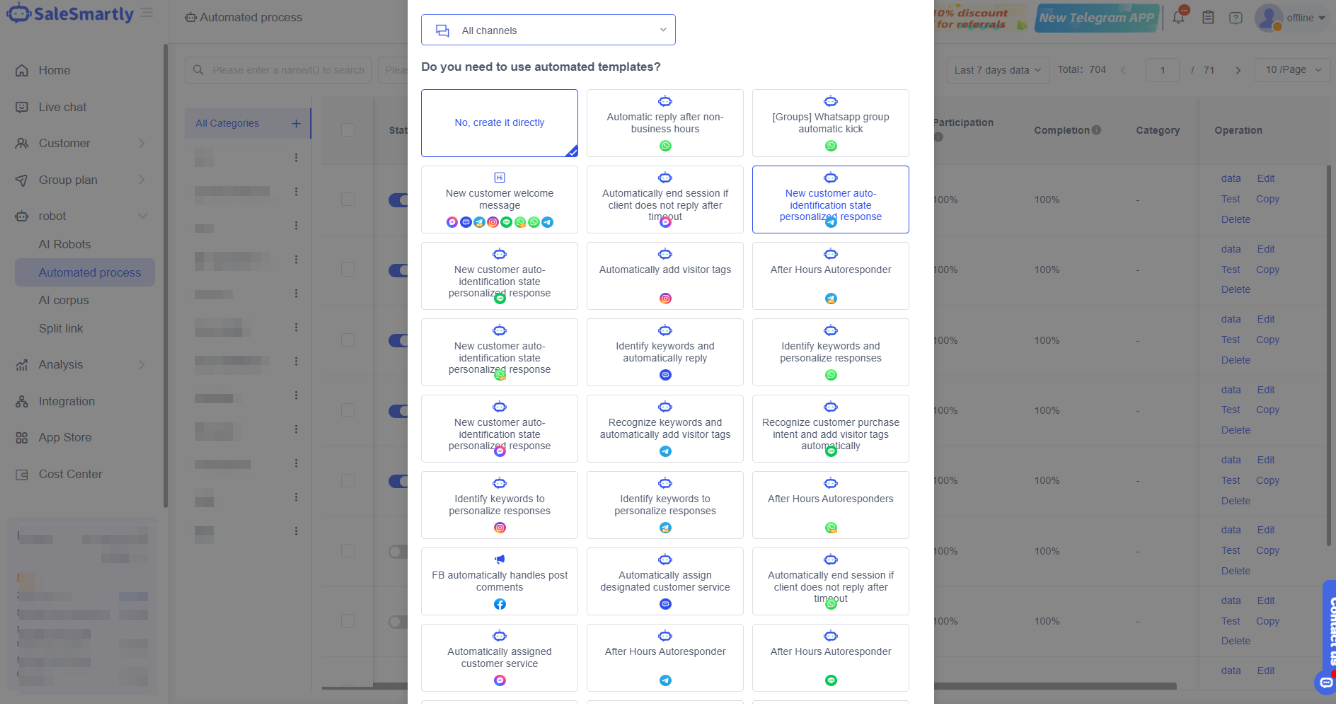
2.6. Automation Templates
When creating a process, you can choose a template for a faster and more efficient setup.
After selecting a template, you only need to make minor adjustments to the preset images or text to complete an automation process suitable for your scenario, saving time and effort.
Note: The channel icons under each template indicate the supported channels. Each template will have its own applicable channels.
Simple Case (Welcoming a New Customer)
If you choose the Welcome New Customers template when creating a message, you will enter the interface shown below. You only need to edit the message content to complete the welcome new customers automation process.
On this basis, you can add other conditions or actions, such as identifying the customer's language, tagging the customer, etc. Automation templates help you build processes more quickly.
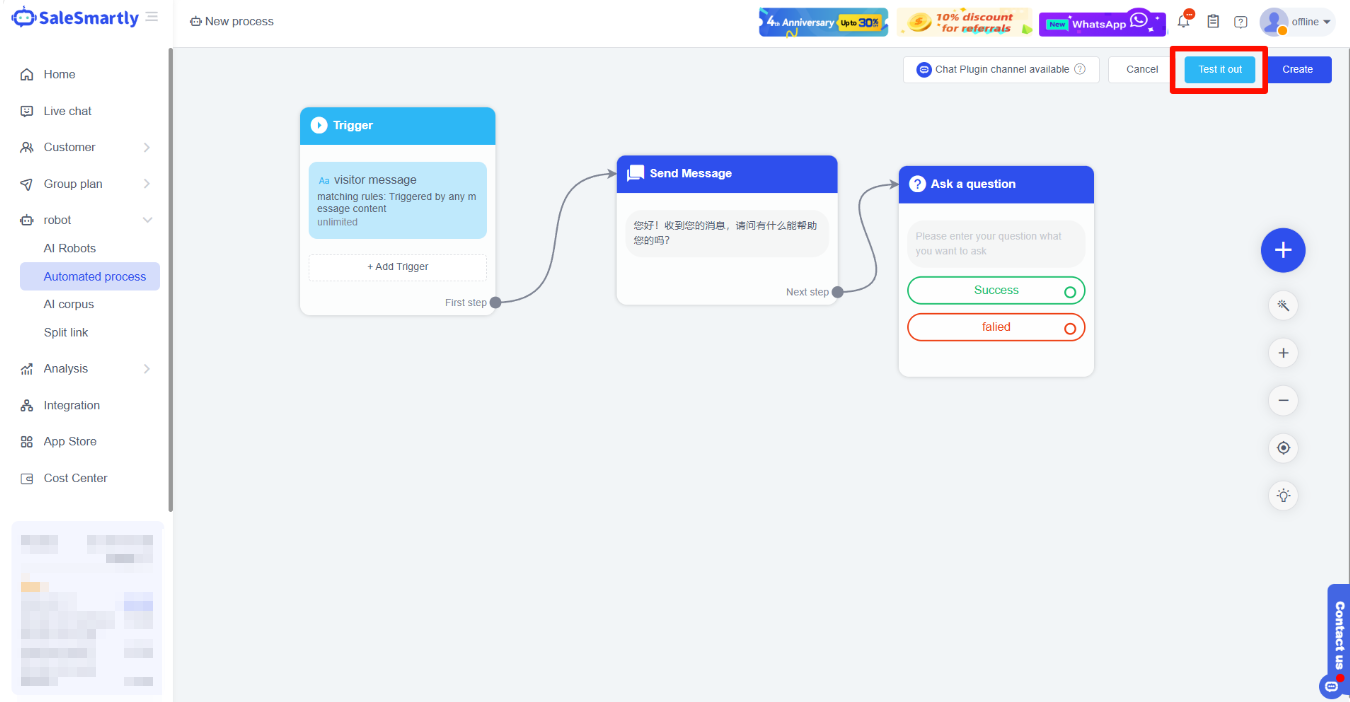
2.7. Test
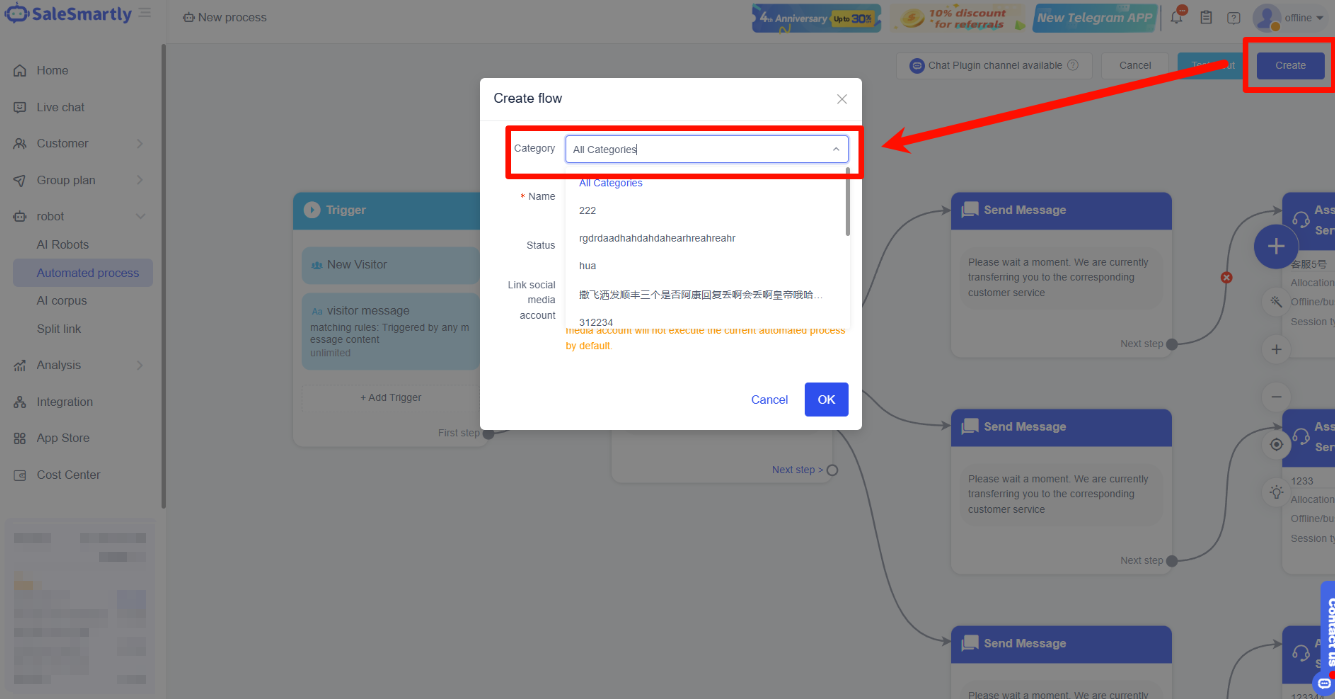
After completing the steps above, click Create, select a Category, and name it to create the automated process. At the same time, you can click Test to experience the actual flow.
2.8. Other Operations
- Auto Layout: When clicked, the overall layout of the process will be automatically rearranged.
- Automation Guide: This provides a quick setup guide to help you create and configure processes.
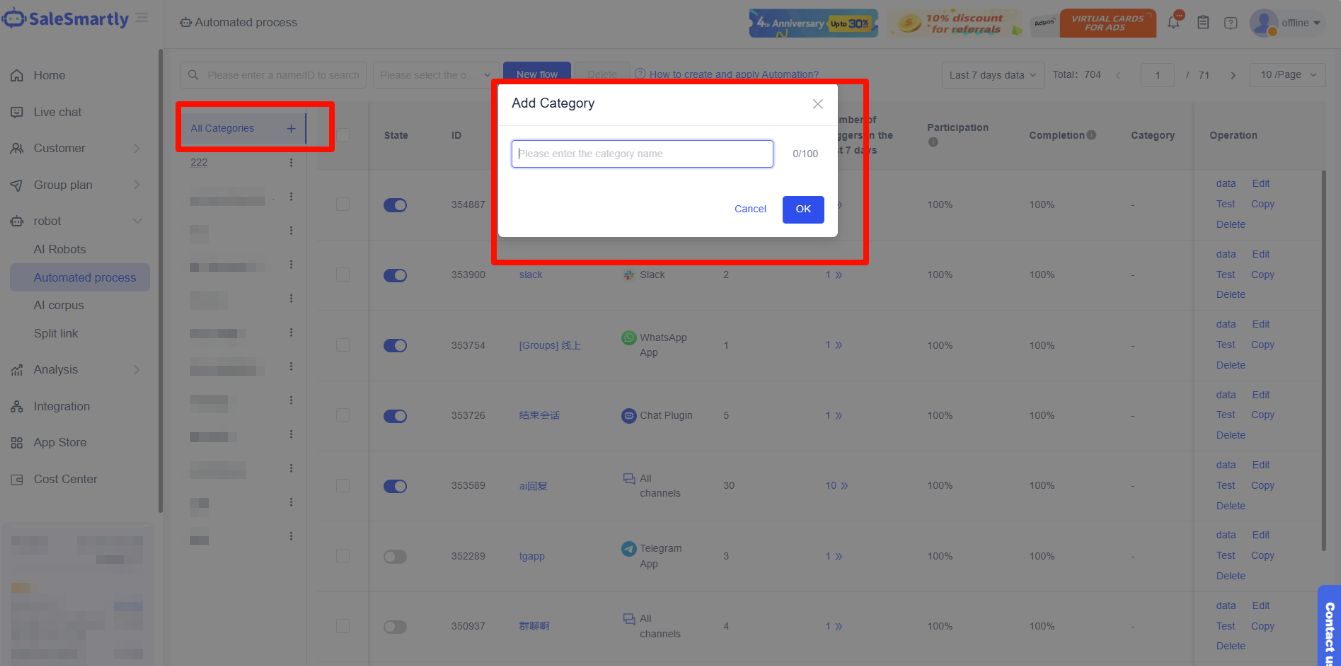
- Categorize Automated Processes
In Robot–Automated Process, click the + sign next to “All Categories” → enter a category name → click OK to create a category.
After creating a category, click Save on the Automated Process editing page, then in Category, select the category you want to assign the process to.
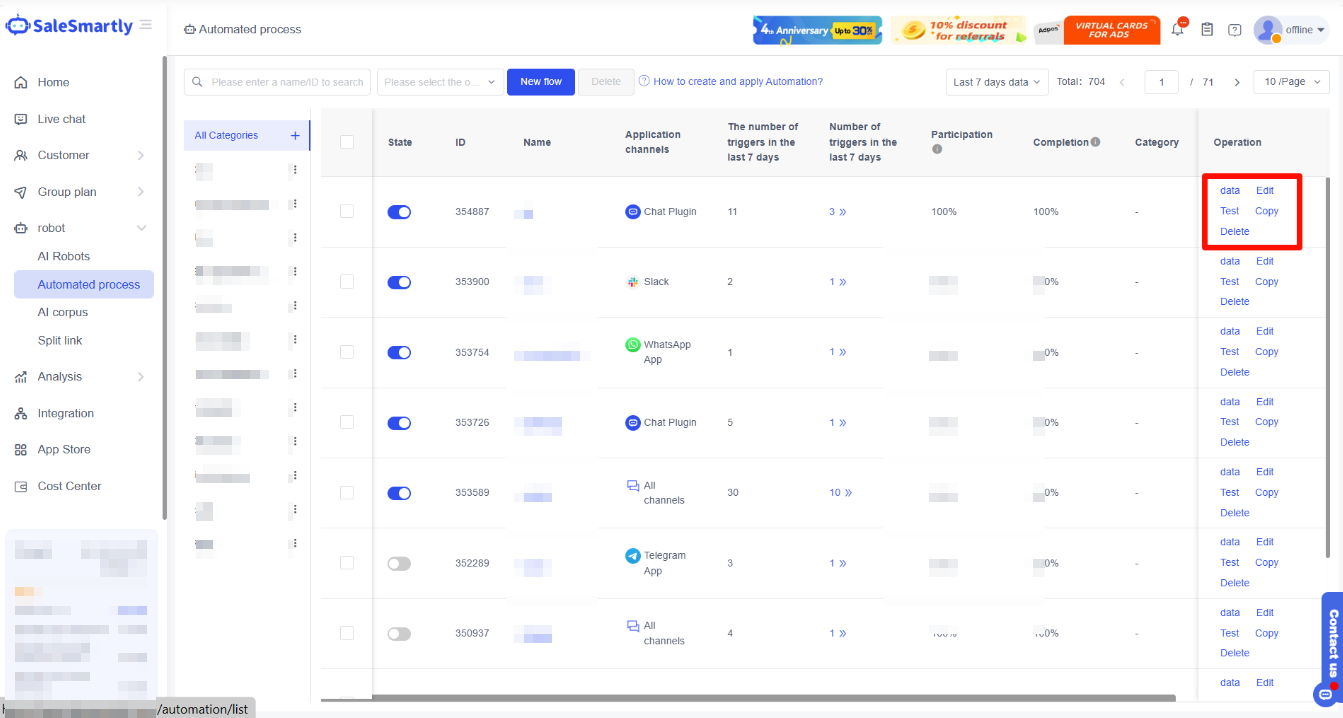
- View Data, Edit, Test, Copy, Delete Automated Processes
In the process list, you can view the created processes, their activation status, supported channels, categories; and perform actions like viewing data, editing, testing, copying, and deleting.
In addition to clicking Edit after the process name, you can also click directly on the process name to enter the editing page.
2.9. Apply the Automated Process
2.9.1 Activate to take effect
After creation, click Activate to enable it; or click Start in the Automated Process interface to activate it. See the illustration below.

2.9.2 Link the Automated Process
After activation, you can apply the process to Chat plugins and social media.
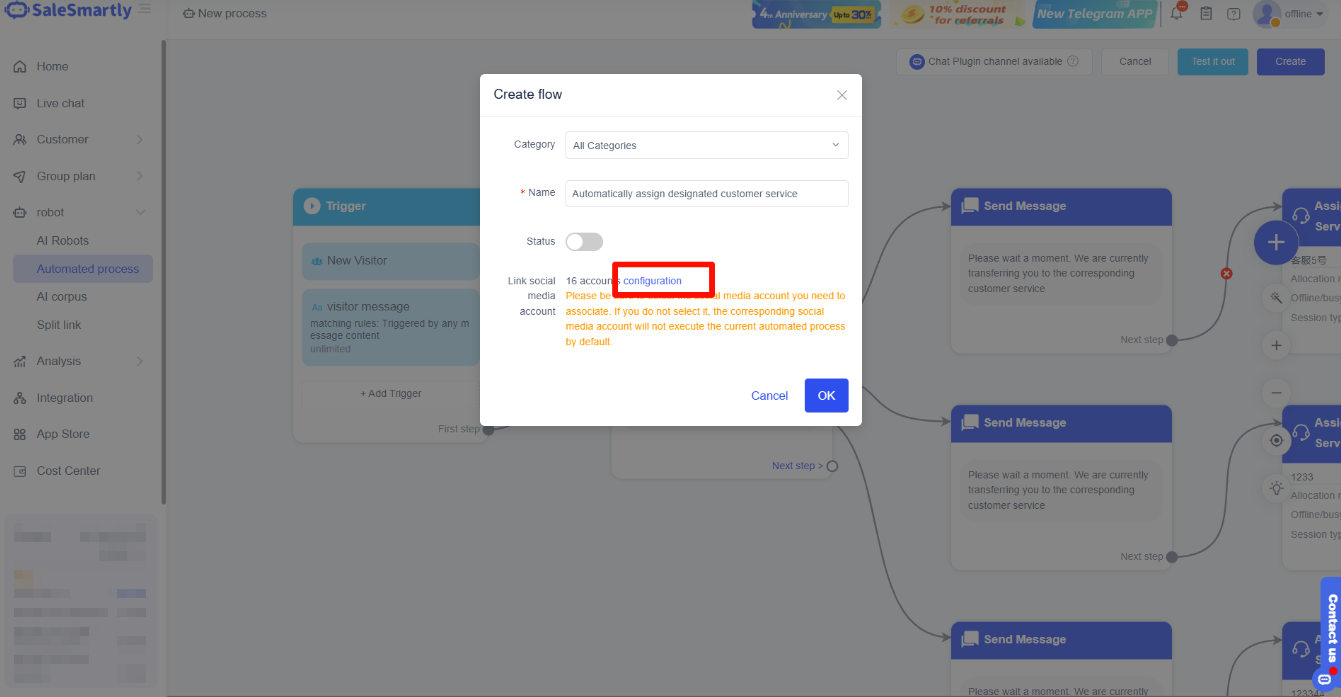
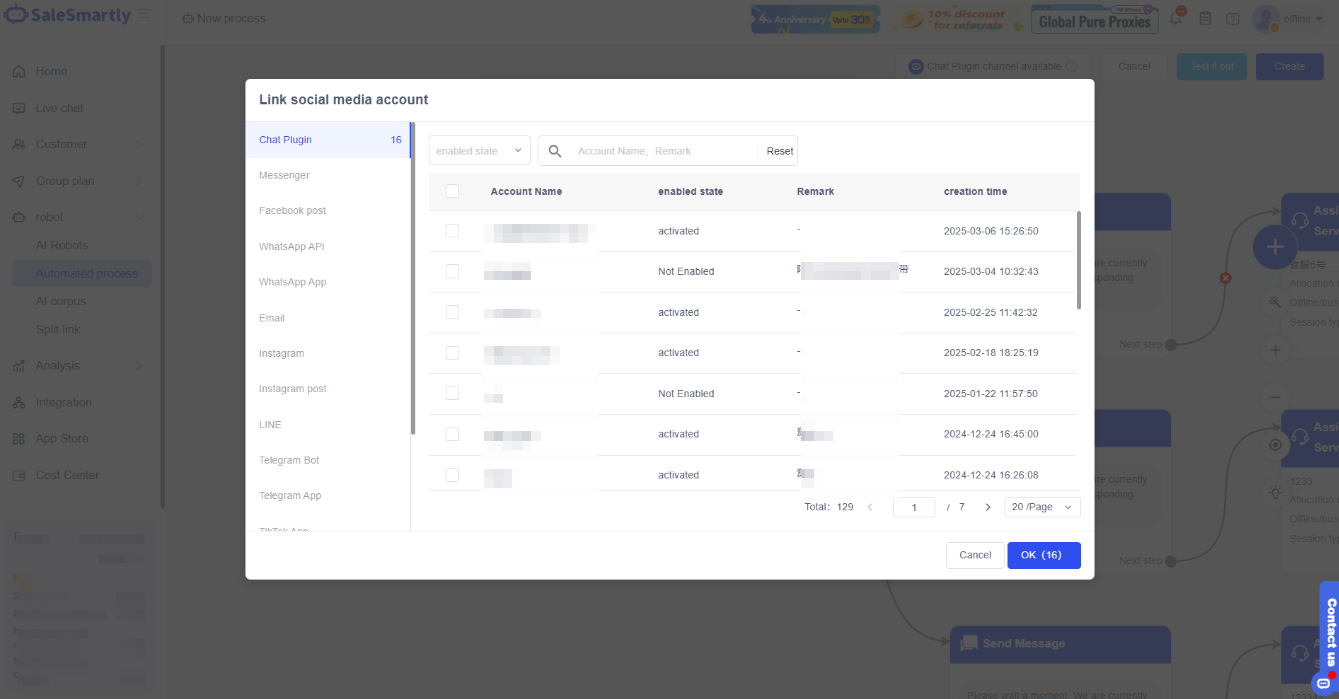
How to configure automation – After editing the process, click Save → click Configure → select the social media account to link → click OK. At the same time, you need to Enable it in the Automated Process interface.
Additionally, you can:
- Configure automation in Integration–Chat Plugin
Go to Integration–Chat Plugin, find the plugin to link → click Edit Automation (please create a Chat plugin first) → select the process to link with the plugin (default is link all). (Illustration uses Messenger channel as an example)
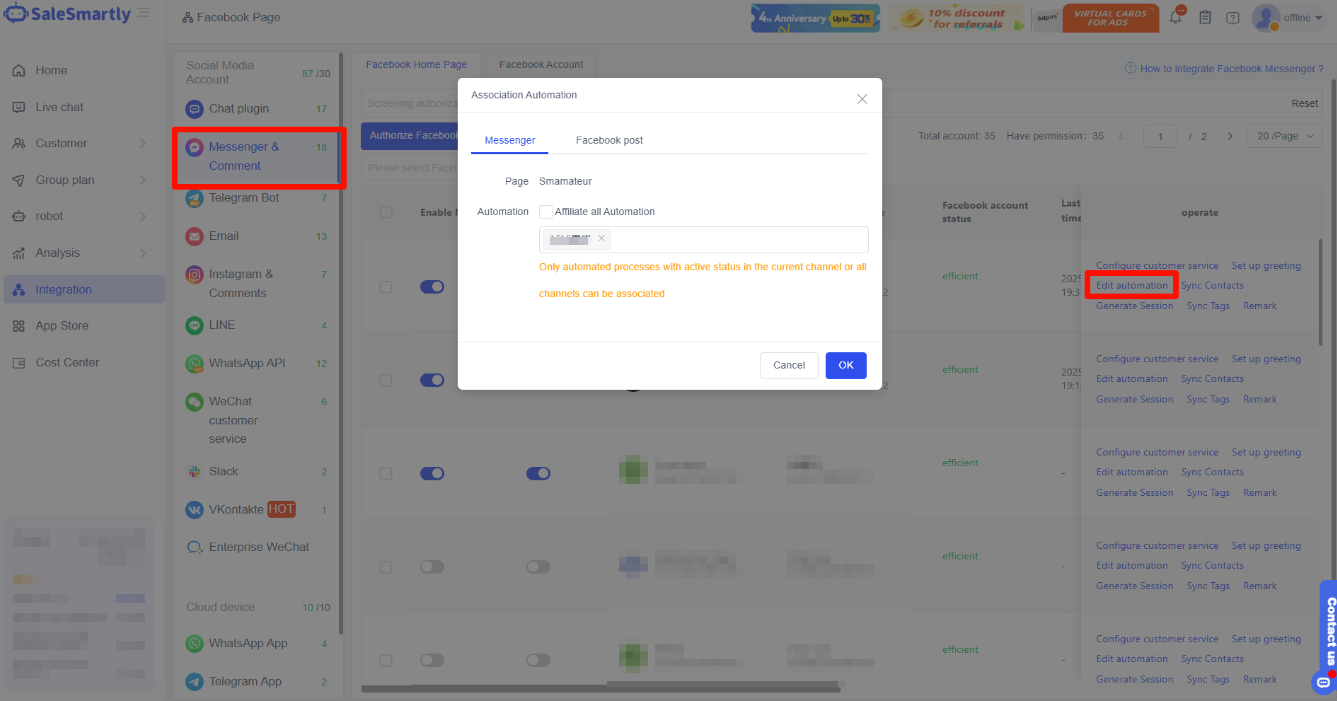
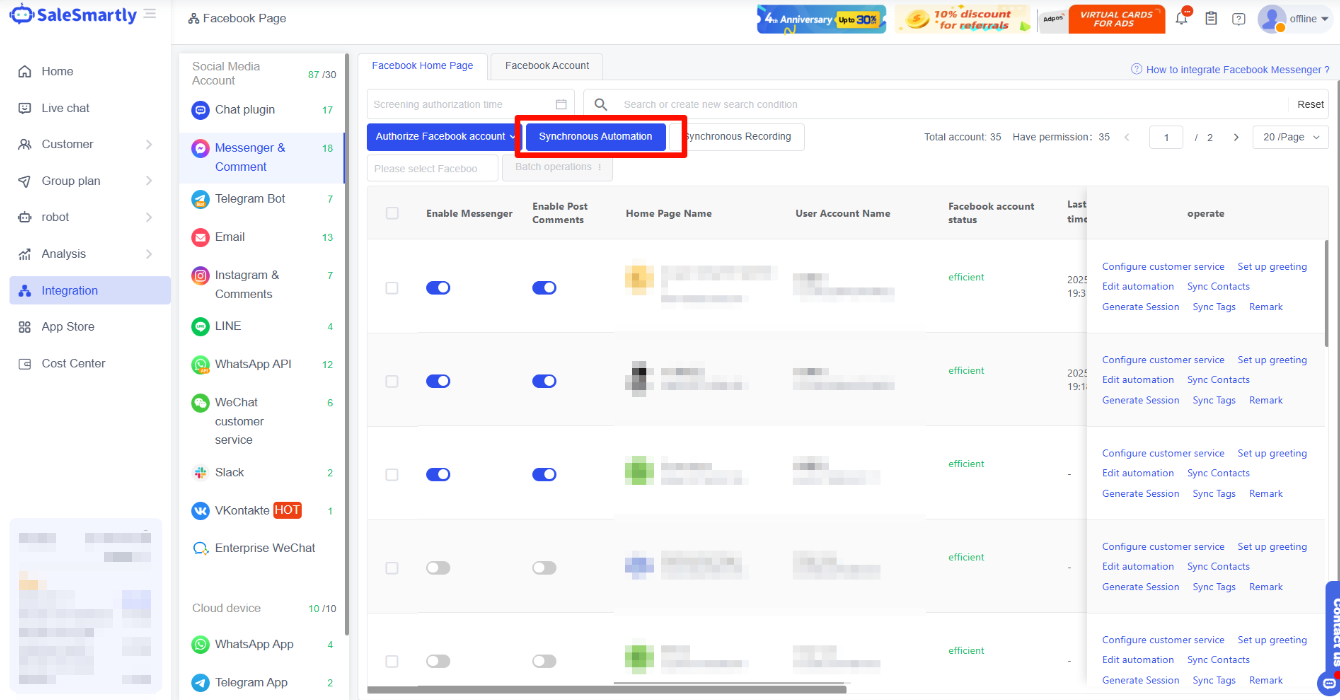
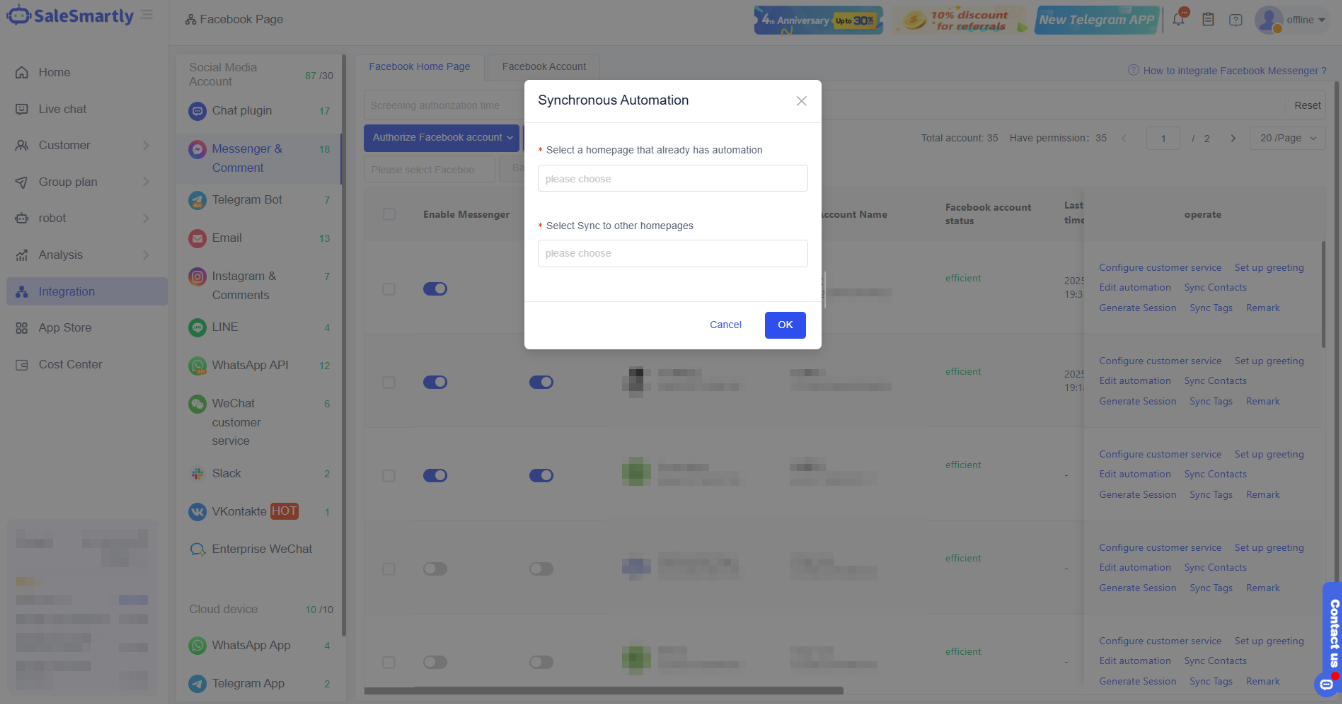
- If it is a Messenger & Comments channel
SaleSmartly also supports automation synchronization, you can select an existing page and synchronize its automation to other pages.
3. FAQs
3.1. After deleting an automation process category, will those processes still appear in “All Categories”?
If you delete a category, the processes within that category will no longer be displayed in All Categories. Please proceed with caution.